Z-Wave Hour Glass Effect kills signal reliability and performance. To make a healthy Z-Wave network you need to know what the Hour Glass Effect is and how to prevent it.
What is the Hour Glass Effect?
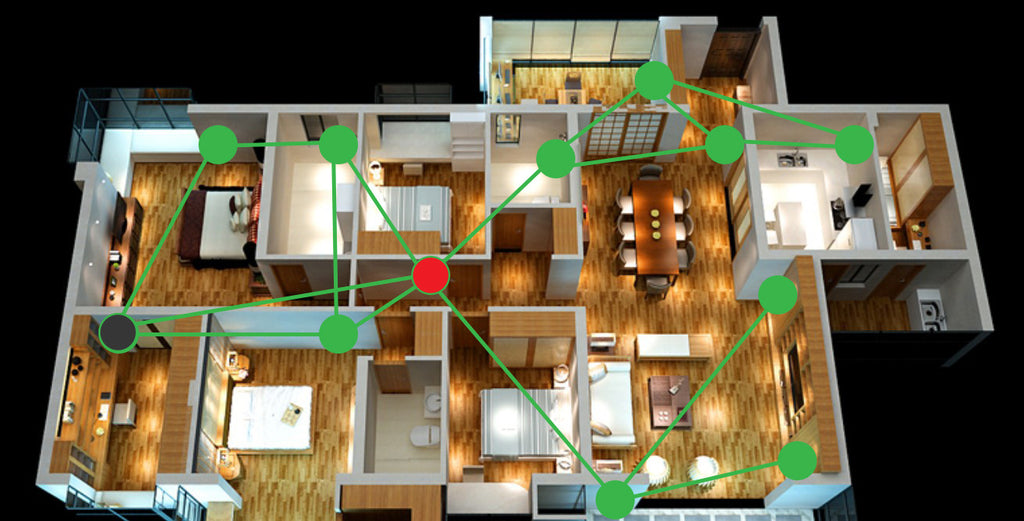
The hour glass effect will kill your Connected Home Mesh Network, leaving you dead in the water, wishing you never made the original Smart Home investment. Yup.... that bad! The hour glass effect occurs when there is a single device that is bridging data transfers for your entire mesh network. This single device acts as a bottle neck to your network (hence hour glass). When it becomes overloaded with data you will see slow response times and potential Z-Wave failure. An example would be if you have an "All Off" scene which sends 20+ device shut off commands through a single bottle neck node. Sending this amount of data through a single bottle neck node you will be able to visually see your devices shutting off slowly.
If you only have a handful of Z-Wave devices the Hour Glass Effect does not effect you as greatly, but should still be thought about to prevent potential performance issues. Below is a diagram (not to scale. Grey Dot Z-Wave Hub, Green Dots Z-Wave Nodes, Red Dot Z-Wave Bottle Neck)
How do you prevent the Hour Glass Effect?
There are several things you will want to keep in mind when setting up or adding to your Z-Wave Network. For best performance you will want to make a couple paths for Z-Wave signal transmissions. The best way to do this is to evenly spread out your Z-wave devices throughout your house (you may want to add a couple to get an even spread). Your Z-Wave hub tries to create the best routing table possible for data transmissions and you can support this from your initial setup of an even spread of devices.
The second thing to think about is when you begin to setup your Z-Wave network you will want to place your hub in a central location of your home (this is very important for larger Z-Wave installs 30+ devices). Ideally a hard wire ethernet connection is preferred but sometimes it is not possible or would take too much work. A great alternative is to put your hub into WIFI bridge mode (some hubs have this feature; we can help). Below is a video on the Hour Glass Effect and how to put your Vera Controller UI7 into Wireless Bridge Mode.
Steps on setting your Vera into Wireless Bridge Mode
1. Log into your Vera Controller
2. Navigate to Settings -> Net & WiFi
3. Under "How does vera Connect to the Internet?" select Through an Wi-Fi access point.
4. Click Scan and connect to a wifi network, then wait for WiFI access points to populate.
5. Enter the WiFi password for the access point you want to connect with and click pick.
6. Once you click pick a warning box will pop up. Click OK (if you don't click ok the settings will not be saved and this will not work)
7. Wait 5 seconds and unplug your network cable. After 2 minutes unplug the power adaptor to power cycle the unit. Once moved to your new desired location you can plug it back in. Once fully booted you will be able to access your Vera just like it was hardwired to the internet.


Comments
Steve Woodward:
You said: 3. Under “How does vera Connect to the Internet?” select Through an Wi-Fi access point.
That is not true with a Vera Plus. These are the choices:
How does Vera connect to the Internet?
Automatically configure (recommended)
Manually configure (advanced)
So how do I pair devices that are in the wall such as switches, etc. and can’t be moved? If I could switch to WiFi connection of the controller to the router, I could get the Vera Plus controller close to those devices with just a power cord.
Documentation of the Vera Plus is weak at best.
Sep 05, 2016
Leave a comment